

–- The first program we will need is S3RC : TS3 Recompressor Tool When on the download page in the first forum post you will find the download. Select the version for your OS.
There are two options available as pictured below: x64 OS and x86 OS

Now that you have downloaded S3RC you need to unzip the .RAR file.
(Using 7 Zip / WinRar etc.)
Once you extract the .RAR file, there will be two files inside: S3RC.exe and Decrapify.exe Move the S3RC.exe to your desktop.

–- The next program that we will need is Delphy’s Sims3Pack Multi Extractor
This program is hosted on Mod the Sims, you must register for the site before you will be able to download it.
Scroll down under the pictures and you will see a navigation menu, click ‘Files’.

Once you are on the files page you will click on the highlighted text next to the magnifying glass.
Always be sure if there is more than one download that you are downloading the most recent version.

Now that you have downloaded Delphy’s Multi Installer you need to unzip the .RAR file.
(Using 7 Zip / WinRar etc.)
Once you extract the .RAR file, move ‘Sims3Pack Muti Installer.exe’ to your desktop.
So now you should have two .exe files on your desktop: S3RC and Sims3Pack Multi Installer (Don’t worry if they do not have icons.)


In this section, I will be showing you how to convert Sims3Pack files into .package files with Delphy’s Sims3Pack Multi Extractor tool.
The reason that we change the file type is to make it easier to convert to The Sims 4.
Important: Do NOT download more than one Sims3Pack at a time, or you will end up with a ton of .package files you will have to sort through.
Make sure you have installed Delphy’s Sims3Pack Multi Extractor and it is located on your desktop.
So, lets get started.
First, we need to get the Sims3Package files we want to convert.
For your purchased TS3 store content:
Login to your account on thesims3.com > Store Navigation > My Store Account > Purchase History Under Purchase History you will find all of the items that you have purchased for TS3.
If you are converting a Sims3Pack or .Package file that has been created by someone other than Maxis make sure that you have permission from the creator to convert.
As some creators do not allow their content to be altered by others.
For this tutorial, I will be converting a Sims 3 Store Set, so that you can see how to distinguish the files from one another in a pack.
I will be doing ‘The Director’s Set‘.

1. Once you have found the item or set that you would like to convert hit download to install to your sims 3 game.
It will open the launcher for The Sims 3, as pictured below.
Once you see the item you downloaded go ahead and close The Sims 3 Launcher.
You do not have to install the item into your Sims 3 game.

2. Next we need to create two new empty files on our desktop.
Sims 3 Packs
Converted .Package
All together we should have the following on our desktop:
3. Next we need to move our downloaded Sims3Pack to our new folder.
You will find your download under: Documents > Electronic Arts > The Sims 3 > Downloads
Move your download to the ‘Sims 3 Packs’ folder you created on your desktop.
4. Open ‘Sims3Pack Multi Installer’ You will see a window like the following open.

Step 1: Hit ‘browse’ and find the ‘Sims 3 Packs’ folder you created on your desktop.
Step 2: Hit ‘browse’ and find the ‘Converted .Package’ folder you created on your desktop
Rename File Check-box: If you are download a Sims3Pack with ONE item included
(Example: A sims3pack with just a chair) check the ‘Rename Files’ box.
If you are downloading a Sims3Pack that is a SET with multiple items included DO NOT check this box.
When you have both of these paths selected to your folders, hit ‘Extract’.
Now you can Close Sims3Pack Multi Installer.
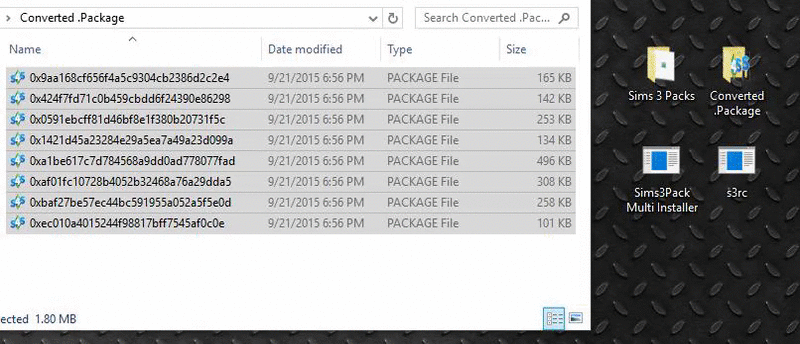
5. Go to the Converted .Package folder you created on your desktop.
You should now have .package files with crazy names like the following:

Each of these .package files is an item included in the ‘Directors Set’ I choose to download.
Meaning, that there are 8 items in this particular set.
6. You can now delete the Sims3Pack file inside of the ‘Sims 3 Pack’ folder on your desktop, you will no longer need it.
(We will be working with .package files from this point on.)

1. First be sure that you have downloaded S3RC and it is located on your desktop.
2. Open your ‘Converted .Package’ folder on your desktop.
(Created in Section Two of this Tutorial)
3. Select your .package file or files.
To select multiple files: Click the first item in the list > ‘Hold Shift’ > select the last item in the list.
Once everything you want is selected it will look like the picture below.

4. Drag and drop your .package files into the S3RC.exe on your desktop.
(As pictured in the .gif below)
NOTE: A Black ‘Command-Line Box’ will appear on your screen.
Depending on how many .package files you are re-compressing it may only take a second and ‘flicker’ on the screen, or it may stay up for a few minutes.
Just let the box do its thing and when it does go away you can Close the Converted .Package folder.
(if you do not want to use S3PE as it is not required for this tutorial, you may Skip Section 4 and continue to Section 5.)

This section is Optional! This section is meant for those of you that have multiple Sims 3 .package files, meaning you have converted an entire set of items.
In this section I will teach you how to open you Sims 3 .package files with S3PE to locate the thumbnail of each of you .package files so you can distinguish which .package is which item.
If you do not have multiple .package files you can skip to SECTION FIVE.
So, Let’s get started.
1. Open S3PE 2. Go up to ‘File’ > ‘Open’ Navigate to your ‘Converted .Package’ folder on your desktop.
‘Open’ the .Package file you would like to check with S3PE.
I Recommend doing them in order starting at the top.
3. Scroll down until you see ‘THUM’, select it. On the right side of the screen, you will now see a thumbnail of the item.

4. Go up to ‘File’ > ‘Save As’ ‘Select’ the .package file that you have open.
‘Delete’ the old .package name in the save box and type in a description that is helpful to you to distinguish the item.
5. Repeat steps 2-4 for all of your Sims 3 .package files, as desired.

In this section, I will teach you how to open your final Sims 3 .Package file with TSR Workshop. So, let’s get started.
1. ‘Open’ TSR Workshop
2. Click ‘Create New Project’
3. Click ‘New Import’ from the Default options then click ‘Next’.

4. On the ‘Import from .package’ page, click ‘Browse’.

5. Navigate to your ‘Converted .Package’ file on your desktop.
Change the file type to .package, it will default to TSR .wrk files.

6. You will now ‘Open’ the desired .package file you would like to import.
A window will pop up asking “Is this a Sims 4 package?” click ‘No’. Important
Note: In the Projectype line, make sure it says ‘OBJECT’ then click ‘Next’.
In some Sims 3 Store sets ‘CLOTHING’ items are included.
I am unable to help with clothing items at this time.

7. On the page called ‘Project Details’ just click ‘Next’.
This page does not matter since we will not be saving our TSR .wrk files.
8. The last page says ‘Finished’ just click ‘Next’.
This completes the Store Object conversion tutorial, to finish your creation
Continue to my TS3 to TS4 Object Conversion Tutorial in SECTION ONE, step 9.
