
 In this section, I will be showing you how to create a clothing recolor using the Hue/Saturation method. This is one of the most common ways to create a recolor.
So, let’s get started.
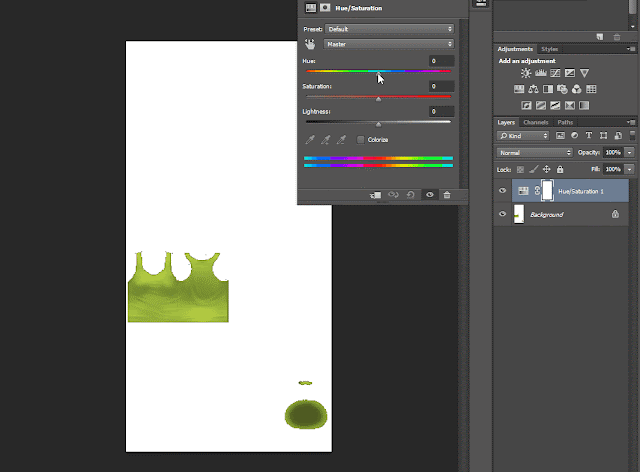
2. For Photoshop users, you can find the Hue/Saturation adjustment on the right side of your screen under the Adjustment tab.
If you do not have it available on your screen you can also go up to:


4. Next, simply move the sliders for Hue to achieve the color you are wanting.
Then, change the saturation to change how vibrant the color is.
Finally, change the lightness to adjust the shadows and highlights of the item.

So, let’s get started.
1. First, create a new layer. Using the Spill bucket spill black on the image.
Next, go up to the filters and select Color. This will turn the image into black/white.
(Even if your image is already black and white, do not skip this step.)

2. First, next to your layers tab, select Channels.
Then, go down to the bottom and click the box next to Alpha 1. This will cause the white background of the image to turn red.
Next, uncheck the box next to the RGB channel. This will deselect the image and leave you with a black and white image (Alpha).
3. Hold Shift + Right Click the ‘Alpha 1’ image. This will select the alpha as pictured below.

4. After your alpha is selected, check the box next to the RGB channel. This will allow you to see the texture again.
5. Next, create a new layer.
Once again, using the spill bucket spill black on the layer.
Go up to Opacity and change it to 85%. I usually use 85% but you can go anywhere between 70%-85% as long as you can see the details of the original texture. Now you have a black recolor of the item as pictured below.

6. Next, create a new layer.
7. Choose a color and use the spill bucket to cover the image.
Change the filter to Linear Light as pictured below.
Now you have a recolor! Repeat step 6 for all colors you would like.

To get different shades, play with colors!
How I achieve different vibrant shades:
Use the spill bucket with grey/white set to liner light and change the opacity to 21%.
Create a new layer, and now you can spill your color(s) you desire.

