STEP 1
So launch Sims 4 Studio.
Under the “CAS” button, select “Create 3D Mesh“.
Then Click the “CAS” button.
STEP 2
First we need to extract our textures and meshes for the item we want to convert using Sims 4 Studio.
Once you find the item you want, select it.
NOTE: If you want to have all of the colors for an item select all the color variations of the object, using Shift+Click.
(as pictured below)
This way all the color swatches will show up so you can extract them.
After you have everything you want, click “Next“.
Save this .package file to your Desktop, as “Base Mesh“.
That way we know this is the file we are starting from.
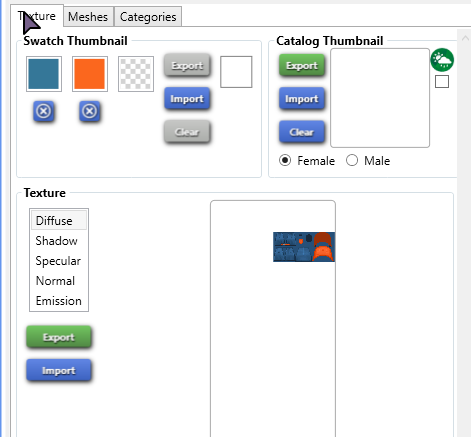
Next extract all of your Textures, under the “Texture Tab“.
Extract all of the following to your desktop.
You will need:
All of the Diffuse textures for each swatch (if you have more than one swatch color.)
Specular
Normal
Next, we need to get the mesh from “LOD 0“, under the “Meshes” tab.
Extract “LOD 0” to your desktop.
If you have all of your textures and your mesh, you can close that Sims 4 Studio window.
STEP 3
Next, we need the Teen – Elder item we are cloning from.
Open a new window of Sims 4 Studio.
Select “Create 3D Mesh” again, and click “CAS“.
Find an item that is similar to the mesh you are converting.
(You do not need to select all color types this time, just one.)
Since I am converting to a baseball cap, I am going to use another type of ball cap.
(as pictured below)
The reason we are selecting a hat that has a similar shape (or sits the same on the head) is to avoid having to make a new hat chop.
(aka how the hair functions with a hat on.)
Once you have your clone, click “Next“.
Save this .package to your mods folder.
Location: Documents > Electronic Arts > The Sims 4 > Mods
STEP 4
Go to the “Meshes” tab, and extract “LOD 0” from your clone.
Save the mesh to your desktop as “Clone“.
Once you have the Clone mesh on your desktop, minimize Sims 4 studio.
We will be coming back to it in a few. (Do not close the window).
Step 5
Find your “Clone” mesh on your desktop, and open it with Blender.
Select the mesh of your accessory until it is highlighted. (as pictured below).
Now that we have our mesh selected, we need to append the mesh we are converting.
Go to: File > Append
Select Desktop if it is not visible, then select your mesh on the desktop.
Once you click on the mesh, you will see a list of items.
Click on the “Object” folder.
Select all of the items named “s4studio_mesh“. These are all the parts to your mesh.
In this tutorial, I only have one to work with.
Now we should have our new mesh visible in the same file with our clone.
Next, you need to move, resize, and make any changes to the new mesh you are wanting.
Do not delete the old mesh, grab and move it out of the way.
So it is no longer sitting in the same spot that our new mesh is going. (Not overlapping)
We will be using it later.
Blender mini-tutorial Here. (coming soon)
Useful Hotkeys for Beginners:
G = Grab (move the mesh around)
G+Z = Move up and down
G+X = Move side to side
G+Y = Move front to back
R = Resize
R+(Z,X,Y) = resize up down, side to side, front to back
Once you have your mesh to your liking:
Select the new mesh until it is highlighted
Hold Shift, then select the cloned mesh.
(Must be selected in that order.)
Now that you have both items selected press, CTRL+J to join them together.
Now both meshes should be joined together and selected in orange.
If you are unsure they joined, you can move the mesh and both parts will move. (as pictured below)
NOTE: By joining the mesh this way, we do not have to worry about cut numbers or bone assignments, But if your mesh has more than one cut, or is on a different body part than the item you are cloning from, you will have to change these.
Now that we have our meshes joined, we need to get rid of the old mesh.
Click “Object Mode” under your model window, and change it to “Edit Mode.
Once you are in “Edit Mode” you will now see a wireframe of your mesh and the old mesh.
If anything is selected and highlighted, unselect it by pressing “A“
Next click “C” to pull up circle select. Select all of the old mesh.
Next press “X or Delete” and delete the old mesh that you selected. (as pictured below)
Now that the old mesh is gone, all we have left is our new mesh.
Once you are happy with it. Save your new .blend.
File > Save as > Save to desktop > Named “New Mesh”.
STEP 5
Open up the Sims 4 Studio window with the clone that we had earlier.
Navigate to the “Meshes” Tab
Import the new mesh you just saved into “LOD 0“.
Wait until it’s done processing, once done. Go to the “Textures” window.
Import your textures you saved from the toddler .package earlier: (Diffuse, Specular, Normal),
Next, navigate to the “Categories” tab.
Make sure that all the tags you want for this item are selected.
If you change any tags, be sure to click “Apply to all swatches” after each change.
(even if you only have one swatch)
Once your LOD O, textures, and tags are set. Click “Save“.
After you save, minimize Sims 4 Studio again. We will be back with it later.
STEP 6
Your .package has been saved! We can now go check it in-game!
We are not finished, we are just making sure that the item we created sits correctly in-game before we go further.
If you need to make alterations to your mesh after checking it in-game, do so now.
The next step will assume that your LOD 0 mesh is to your liking.
STEP 7
Now that we have our LOD 0, we need to get the rest of our LODS.
For this tutorial, our mesh has 4 LOD’s total. So we need to make 3 more meshes.
Open your “New Mesh” in blender again.
Go into “Object Mode” again, and select all of your mesh.
On the left-hand side of the view window, You will have the scene window.
On the bottom of the scene window, you have a navigation bar with icons.
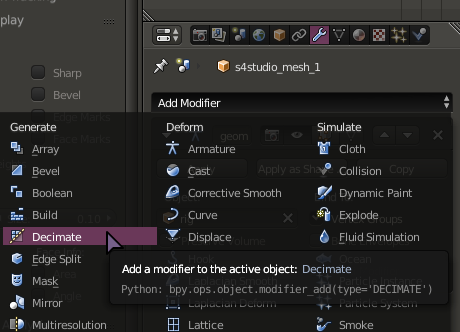
Select the icon that looks like a wrench aka “Object Modifiers“. (as pictured below)
Once you are on the Object Modifiers window, select “Add Modifier“.
From the drop down window, select “Decimate“.
Now you should have the new “Decimate” modifier listed.
Next, we need to change the ratio, lets do the first one from 1.0 to 0.9800
Then click “apply“. You have now reduced the amount of polys of your mesh.
Save your decimated mesh to your desktop as LOD 1.
Repeat the decimate process above, reducing your ratio a little each time.
Example: LOD 1: 0.98, LOD 2: 0.85, LOD 3: 0.75, LOD 4: 0.65
NOTE: You only want to do this in small increments, or you risk tearing your mesh or decimating the quality overall.
STEP 8
Now that we have a decimated mesh for each one of the LOD’s we need to upload them to our .package.
Open up your Sims 4 Studio mesh again, and navigate to the “Meshes” tab.
Select the drop-down window with your LOD’s and import each one of your new LODs.
Once you are done, you should have a new mesh for LOD 0 – LOD 4.
STEP 9
Now go to the “Textures” tab, and import any other textures/swatches you have for your new mesh.
If you are done with textures, skip to Step 10.
STEP 10
If your new mesh requires or needs to require a specific game pack we can change this now.
If you cloned your mesh from the game pack you wanted it to require, you can skip to Step 11.
With your new .package open, on the top navigation window.
Navigate to: Tools > Modding > Add DLC Pack Requirement
A window will pop up, with a drop-down window will all the packs.
Select the one you want your new mesh to require.
For this project I am doing I am converting a seasons hat to adult, so I want it to require seasons.
Once you have the pack you want to be selected, click “Ok“.
You will not see changes until after you re-open the .package.
So next click “Save“.
You can now close the .package and re-open it to see the new pack requirements or go test in-game.
You are now done!
You can download the hats we created in this tutorial HERE!